- DESC
2.630
VIEWS
0
COMMENTS
0
STARS
While they are a bit lacking in the PvE mode of Guild Wars 2, ![]() Necromancer are quite strong in the Player vs Player aspect of GW2.
Necromancer are quite strong in the Player vs Player aspect of GW2.
With the recent changes of the first Path of Fire balance patch, the new Scourge elite specialization makes them the most oppressive they’ve been in the game’s history. This guide aims to provide details and explanations on the current most popular Scourge build in 5vs5 PvP.
This build is about converting boons on enemy players into conditionsdealing huge amounts of condition damage and providing some minor support via barriers in teamfights.
The Build – Traits, Gear, Utility Skills

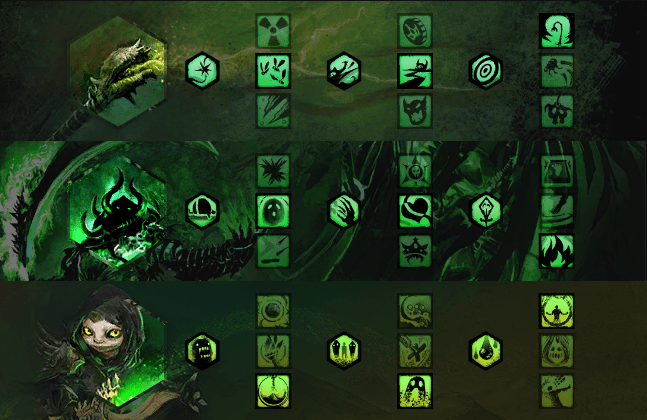
The picture above shows the traits used by this Scourge build. The lines and traits used are the following:
- Curses: Plague Sending, Path of Corruption, Weakening Shroud
- Soul Reaping: Soul Marks, Fatal Persistence, Dhuumfire
- Scourge: Nourishing Rot, Unending Corruption, Sand Savant
Weapons
Staff (Sigil of Annulment, Sigil of Energy and Scepter/Torch (Sigil of Doom, Sigil of Revocation). Rune is Scavenging for added condition damage and some lifesteal, Amulet is Deadshot Amulet for a good mix of condition damage, crits and survivability.
Heal and utility skills
Consume Conditions, Plague Signet and Trail of Anguish. One utility slot is free for you to choose depending on the situation. Take Spectral Armor if you need some added protection; if you are on a map with more verticality (Nifhel, Temple of Silent Storm), you can consider Sand Swell for teleporting between vantage points. Corrupt Boon can be used against teams stacking lots of boons (look for Guardians in the enemy team before the match actually starts).
Elite skill is Ghastly Breach for even more boon removal and suppression. Always use this in larger teamfights to suppress them even more.
This build is all about suppressing conditions placed on you, turning boons on enemy players into conditions and suppressing areas via a well-placed Sand Shade.
In 5vs5 PvP, a Greater Sand Shade covers about 90% of a capture point if placed in the middle, so you can effectively hold down or defend a capture point from enemies even by not being there.
You can also use a well-placed Sand Shade to enact pressure on incoming enemies – this works especially well on maps featuring choke points, such as Battle of Kyhlo (stairs and ramps at the sides of points), or Nifhel (around the mid point).
How to play
Since you are mainly a damage dealer with a little bit of support added in, you should always stay with your teammates.
At the beginning of each match, go to mid with most of your team. Avoid going alone, and always stay on or near the mid point. Since mid is usually larger than the other two capture points, Greater Sand Shade can be very helpful in suppressing one half of it and you occupying the other.
Since all Sand Shade effect manifest around your character and the Sand Shade, this gives you opportunity to cover more ground with huge condition damage. Note that only one effect can be triggered this way – so there is no point in stacking with your shade, and this is the reason for choosing Sand Savant as the third trait.
Your main source of damage is the F1-F5 set of effects and 4-5 on Torch. Staff skills (with the exception of #4) are also used for huge area suppression. Staff #5 is a fear, which can interrupt enemies, so you can use this to prevent enemies from finishing your downed teammates. And Staff #4 transfers conditions from you to the foe that triggered it. There is an important thing about these Staff marks – none of them trigger unless the enemy is moving inside it – so casting them on a downed enemy doesn’t trigger their damage by itself, but this can be used to slow down others trying to revive them.
Basically, the easiest rotation against most enemy players is to press F1, F2 and F3, then use weapon skills on them for additional damage. Staff marks restore significant amounts of Life force, enabling additional shroud skill spamming, so make use of those too. If the enemy has many boons on them, use Corrupt Boon and keep spawning the Shade with F1 to convert them into conditions. Spawning the Shade multiple times also procs the Dhuumfire trait and every other trait related to should, so triple-spawning Shades into a teamfight is a great way of putting huge pressure on the enemy.
Weaknesses
This build is very strong as of the November 7, 2017 balance patch and is quite prevalent in most of the Guild Wars 2 PvP matches due to its relative ease of use and high damage output. However, thieves and other single-target high burst classes are quite powerful against it, this is the reason you should always stay with your team.
